Carnation Breakfast Bars Recipe
Looking for a quick, nutritious breakfast? These Carnation Breakfast Bars blend oats and peanut butter for an energizing start to your day. Ready in just over an hour!

Rise and Shine with Carnation Breakfast Bars!
Oh my gosh, let me tell you about that one crazy morning when the alarm decided to play hide and seek! i was running late for work, and you know how it goes—mornings can be a mad dash.
So, in my attempt to juggle coffee, shoes, and, oh yeah, breakfast, i reached for a box of carnation breakfast bars .
Seriously, talk about a life-saver! there's just something so comforting about them. they’ve got the sweetness from dried fruit and that satisfying crunch you crave.
Honestly, if you haven’t tried making your own breakfast bars yet, you’re in for a treat!
What’s the Deal with These Bars?
Historically, breakfast bars have come a long way. they used to be a simple snack; nowadays, they’ve become the go-to for busy folks or anyone chasing that perfect balance of sweet and savory flavors.
And if you’re thinking about whipping some up for yourself, they’re incredibly easy to make. we’re talking about 15 minutes of prep and some chill time , and boom—you’ve got yourself a nutritious snack that’s ready to go.
These carnation breakfast bars aren’t just trendy either; they’re budget-friendly too! with just a handful of ingredients you probably already have lurking in your pantry, you can whip up a batch of 12 filling bars .
Perfect for grabbing on your way out the door or stashing in lunchboxes!
More than Just a Snack!
Now, let’s chat health benefits! these bars are loaded with whole grain goodness thanks to rolled oats. they pack a decent amount of protein and fiber, which means they’ll keep you full longer—perfect for those mid-morning work slumps.
Plus, they're super versatile. you can mix in whatever dried fruits or nuts tickle your fancy. feeling like some chocolate? toss in some mini chocolate chips, and you’ve got a treat that feels indulgent without the guilt.
Great for kids? you bet! these bars also make a perfect after-school snack. they’re kid-friendly and can even help with meal prep, making those chaotic afternoons a bit smoother.
Trust me; you’ll want to make a big batch because they’ll disappear faster than a cookie at a bake sale!
Why You’ll Love These Bars
Besides being an easy oatmeal snack , what makes these breakfast bars stand out from the rest? it’s all about customization! you can easily swap ingredients to fit your needs or taste.
Want to go nut-free? use sunflower seed butter instead of peanut butter! or how about adding a few spices like cinnamon for an extra kick?
The appeal doesn’t stop there. if you like the idea of no-bake options, just chill them in the fridge until firm.
You won’t even need the oven! yep, these bars are a winner through and through. whether you’re hunting for quick breakfast options or just some high-fiber snacks , these bars tick all the boxes.
So, are you ready to dive into a world of flavor and fun? Let’s gather our ingredients and get started on these delightful carnation breakfast bars !
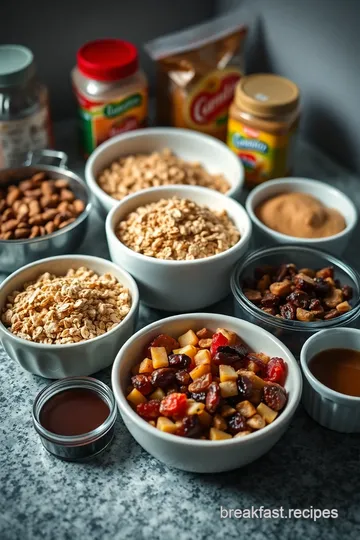
Ingredients Needed
Here’s what you’ll need for your journey to yummy, energizing breakfast goodness:
- 2 cups rolled oats
- 1 cup crunchy peanut butter
- ½ cup packed brown sugar
- ¼ cup honey (or maple syrup)
- 1 teaspoon vanilla extract
- ¾ cup dried fruit (cranberries, apricots, or raisins)
- ¼ cup mini chocolate chips (if you want them, of course)
- ½ teaspoon ground cinnamon
- Pinch of salt
There you go, all set to make a nutritious snack idea the whole family will love! Whether it's for a quick breakfast or an energizing midday treat, these Carnation Breakfast Bars are sure to become a household staple! Let's keep the good vibes going and get baking!
Your Essential Ingredients Guide to Delicious Breakfast Bars
Let’s dive headfirst into making some fabulous and nourishing carnation breakfast bars! seriously, if you haven’t tried whipping these up yet, you’re in for a treat.
They’re basically the perfect easy oatmeal snack . plus, you’ll be the star of every brunch, picnic, or school lunch with these beauties.
So, let’s get rolling with our essential ingredients guide !
Premium Core Components
First things first – measurements ! it’s all about getting this right. for the base of our carnation breakfast bars, you need 2 cups (180g) of rolled oats .
It’s important to use rolled oats for that chewy, hearty texture. then grab 1 cup (240g) of crunchy peanut butter .
Trust me, that crunch is everything. we’ll sweeten things up with ½ cup (100g) of brown sugar and ¼ cup (85g) of honey or maple syrup .
Top that off with 1 teaspoon (5ml) of vanilla extract for an aromatic kick.
When it comes to quality indicators , look for oats that are fresh and whole; they should smell mildly nutty and have a slight golden hue.
Store your oats in a cool, dry place; they last about six months.
Now, let’s chat about freshness tips . dried fruits like cranberries or apricots are perfect as add-ins. just make sure they're not too hard or too sticky.
Soft and plump is the way to go!
Signature Seasoning Blend
Let’s jazz up those bars with some flavor! you’ll want ¾ cup (120g) of dried fruit – cranberries or raisins are fab choices.
Want a little indulgence? toss in ¼ cup (45g) of mini chocolate chips . and let’s not forget the magic of ½ teaspoon (2g) of ground cinnamon for that warm, cozy feel.
Feeling adventurous? you can always throw in some sea salt on top before baking; it adds a delightful contrast.
Smart Substitutions
Sometimes life doesn’t go as planned, right? no worries! if you find yourself out of peanut butter, try almond butter - it’s totally delicious! if you want them gluten-free, just swap for gluten-free oats.
And hey, if you’re short on time, you can even use your pantry leftovers and recreate these bars based on what you have.
It’s all about customizable snack bars !
Kitchen Equipment Essentials
Now you’ve got your ingredients, but let’s make sure you've got the right tools. Here’s your must-have list:
- A 9x9-inch baking pan lined with parchment paper (trust me, you want easy removal!)
- A trusty mixing bowl and a good spoon or spatula for mixing.
- Don’t forget your measuring cups and spoons . Precision is key!
- Finally, you’ll need a sharp knife for cutting those bars to perfection.
Chillin' Out
This recipe is a breeze. the prep time takes about 15 minutes, then you let these babies chill for about 30 minutes to firm up.
While they cool in the fridge, you can go catch that episode of your favorite show or take a nap.
Seriously, it’s that easy!
Unleashing the Deliciousness
When you’re ready, simply follow the instructions to combine all those glorious ingredients and bake at 350° f ( 175° c) .
You'll know they’re done when they look just slightly golden. here’s a tip: let them cool completely before cutting; trust me, it’s worth the wait.
The bars will hold together much better this way.
So there you have it! your go-to guide for making carnation breakfast bars . these little powerhouses are loaded with energy—a comprehensive blend of nutrients that are as tasty as they are satisfying.
Perfect for meal prep snacks or just to grab and go in the morning.
In the next section, we’ll dive deeper into the step-by-step instructions so you can whip up these protein-packed snacks in no time.
Get ready to impress your family and friends with what may just become your new favorite healthy comfort food !
Professional Cooking Method for Carnation Breakfast Bars
Cooking can feel overwhelming sometimes, can't it? trust me, i've been there! but knowing a few professional cooking methods can turn your average home kitchen into a gourmet haven.
Let’s dive into the carnation breakfast bars recipe because, honestly, there’s nothing better than a nutritious and easy oatmeal snack to fuel your day.
Essential Preparation Steps
Before you even think about throwing ingredients together, it’s critical to set yourself up for success. enter mise en place —that fancy french term that just means having everything ready.
Chop your dried fruits, measure out those rolled oats, and have your peanut butter at the ready. seriously, dig out your measuring cups, folks!
Time management is key when you’re in the kitchen. i learned the hard way, waiting until the last minute to prepare can lead to chaos.
Give yourself 15 minutes to prep for these bars. that way, you won't be scrambling when it's baking time!
Keep a clean workstation. a messy kitchen can be a recipe for disaster. organization is the name of the game! have your baking pan lined with parchment paper and all your tools handy.
And, let’s be real—always think about safety. keep that kitchen knife away from the kiddos and use oven mitts to protect your hands.
Safety first, folks!
Step-by-Step Process
Here comes the fun part! Let’s get that oven preheated to 350° F ( 175° C) because we’re about to bake some deliciousness!
-
Prepare the Pan: Line a 9x9-inch baking pan with parchment paper. Leave an overhang; this makes it super easy to lift those bars out later.
-
Mix Oat Base: Grab a mixing bowl and toss together 2 cups of rolled oats, ½ cup of packed brown sugar, ½ teaspoon of ground cinnamon, and a pinch of salt.
-
Combine Wet Ingredients: In another bowl, mix together 1 cup of crunchy peanut butter, ¼ cup of honey, and 1 teaspoon of vanilla extract until smooth and creamy.
-
Combine Mixtures: Pour that peanut butter goodness over the oat mix and give it a thorough stir. Get your spatula in there!
-
Add Dried Fruit: Toss in about ¾ cup of dried cranberries or raisins —whatever floats your boat. If you're feeling wild, throw in some mini chocolate chips too!
-
Press into Pan: Transfer this hearty mixture into your prepared pan. Use the back of the spatula to press it down firmly; this step is crucial!
-
Bake: Now, pop it in the oven for 20 minutes or until lightly golden. Keep an eye on it!
-
Cool and Chill: Let it cool for 10 minutes , then lift it out using the parchment. Allow it to chill in the fridge for 30 minutes more—it’s worth it!
-
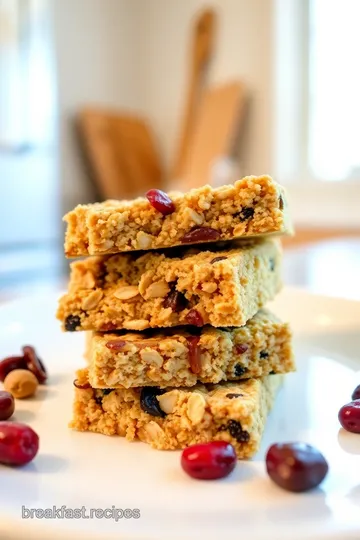
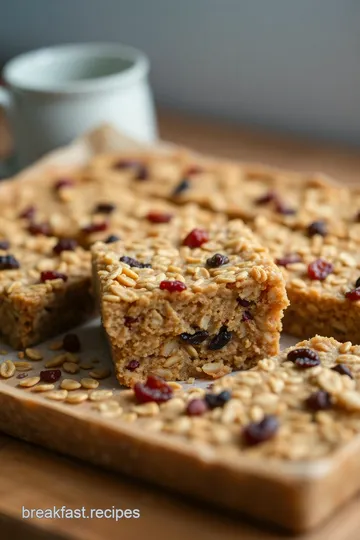
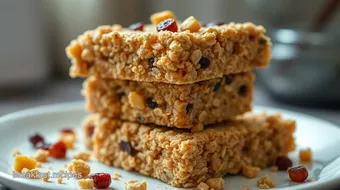
Slice and Serve: Finally, cut into squares. These bars can be enjoyed right away or stored for later munching.
Expert Techniques
A few pro tips? first, make sure to press the mixture firmly into the pan. this helps the bars stay together once baked.
Also, cool them completely before cutting. trust me, this mix-up can lead to crumbly disasters!
And when it comes to quality checkpoints , look for that golden hue and firm texture before pulling them out—don’t be shy to use your eyes! they’ll be less than stellar if they’re mushy, and nobody wants a disaster snack.
Success Strategies
Now, let’s talk mistakes. A common rookie move is not pressing the mix enough. You want these to stick together, so press hard, folks! And when it comes to storage, keep them in an airtight container up to a week—though I doubt they’ll last that long!
Thinking about meal prep ? These Carnation breakfast bars freeze well! Wrap each one up tightly, and you’ve got a quick breakfast or on-the-go snack whenever you need it.
Additional Information
So there you have it! these nutritious snack ideas are not just tasty but also super customizable. you can swap out ingredients based on what you have at home.
With a little prep, you’ll nail it every time. and who wouldn’t want a protein-packed snack that’s also a sweet treat?
Whip up these Carnation breakfast bars soon! You’ll find that they fit right into your hectic mornings or can be the perfect afternoon energy booster. Happy baking, friends!
Unlocking the Secrets of Carnation Breakfast Bars
These aren’t just any snack bars; they are carnation breakfast bars ! these little gems are the perfect blend of flavor and nutrition.
They’re easy, no-bake breakfast bars that seem custom-made for our on-the-go lives. let’s dive into some juicy pro tips to make these bars stand out, shall we?
Pro Tips & Secrets
Let’s start with a few tricks i’ve picked up along the way. when you're mixing up your carnation breakfast bars recipe , make sure you press firmly into your pan.
This really helps them stick together instead of crumbling apart. oh, the frustration when delicious bars decide they want to fall apart, am i right?
If you’re short on time (and who isn’t?), try using a microwave to soften your peanut butter before mixing. it makes for a quick oatmeal snack and helps to blend everything smoothly! and don’t be shy with the cinnamon—just a pinch can go a long way in enhancing flavor.
Trust me; your taste buds will thank you!
Perfect Presentation
Now, onto the fun part: presentation! plating can transform your healthy snack recipes into an instagram-worthy masterpiece. when you cut your bars, try to go for precise squares.
Arrange them in a colorful bowl, maybe with some extra dried fruit around them for pop. think of color combos! dried cranberries against a yellow banana—such eye candy!
A sprinkle of chia seeds or a drizzle of honey on top can elevate your bars both in taste and eye appeal.
Presentation matters, especially when that plate is heading to a brunch table full of friends!
Storage & Make-Ahead
There’s nothing better than meal prep snacks, especially these oatmeal energy bars . after you slice them up, store in an airtight container for up to a week at room temperature or longer in the fridge.
If you freeze them, they'll last a couple of months. just make sure to wrap each bar individually; this way, you can pull out a quick breakfast option whenever you need one.
To reheat, a quick 10 seconds in the microwave does wonders. They’ll taste like fresh-baked goodness again!
Creative Variations
Feeling adventurous? you can absolutely change things up! swap dried fruit for seasonal twists like fresh peaches in the summer or apple chunks in fall.
Love chocolate? go for dark chocolate chips instead of mini ones. and if you’re looking for dietary modifications , switch out the peanut butter for almond or sunbutter if you need them to be nut-free.
There are sooo many ways to customize these bars.
Complete Nutrition Guide
Let’s talk nutrition! these bars pack in protein and healthy fats, thanks to the peanut butter. each bar serves up around 6 grams of protein , making them great for a mid-morning boost or afternoon pick-me-up.
Plus, you get a little fiber from the oats and fruit, so you’ll feel fuller longer. how awesome is that?
Expert FAQ Solutions
So, what if you hit a snag while making these? don’t sweat it! if your mix seems too dry, add a splash of milk back in until it comes together.
If you're unsure whether those bars will hold up, remember to cool them completely before cutting. the chilling helps them become firm and sturdy.
If you want to get experimental, swap glazes or toppings to keep things exciting.
Wrapping It Up
In the end, these carnation breakfast bars are way more than a recipe; they are a canvas for creativity and a goldmine of nutrients.
Whether you are whipping them up during the weekday rush or having a chill weekend baking spree, they’ll satisfy your tastebuds and your health goals.
So, roll up those sleeves and give these bars a shot. You’ll feel like a kitchen superstar, and who doesn’t love having a stock of tasty on-the-go breakfast bars ready to enjoy? Trust me, you’ll be hooked!
Carnation Breakfast Bars Recipe Card
⚖️ Ingredients:
- 2 cups rolled oats (180g)
- 1 cup crunchy peanut butter (240g)
- ½ cup packed brown sugar (100g)
- ¼ cup honey or maple syrup (85g)
- 1 teaspoon vanilla extract (5ml)
- ¾ cup dried fruit (cranberries, apricots, or raisins) (120g)
- ¼ cup mini chocolate chips (optional) (45g)
- ½ teaspoon ground cinnamon (2g)
- Pinch of salt
🥄 Instructions:
- Step 1: Line the baking pan with parchment paper, leaving an overhang for easy removal.
- Step 2: In a large mixing bowl, combine rolled oats, brown sugar, cinnamon, and salt.
- Step 3: In a separate bowl, mix peanut butter, honey (or maple syrup), and vanilla until smooth.
- Step 4: Pour the wet mixture over the dry ingredients; use a spatula to combine thoroughly.
- Step 5: Stir in the dried fruit and mini chocolate chips if using.
- Step 6: Transfer the mixture into the prepared baking pan and press down firmly using the back of a spatula.
- Step 7: Bake in a preheated oven at 350°F (175°C) for 20 minutes or until just firm and lightly golden.
- Step 8: Allow to cool in the pan for about 10 minutes, then lift out using parchment overhang. Let chill in the refrigerator for at least 30 minutes before cutting into bars.
- Step 9: Cut into squares and serve, or store in an airtight container.
Previous Recipe: How to Brew the Perfect Cup: Easy Toastmaster Coffee Maker Secrets
Next Recipe: How to Make Cheesy Mini Vegetable Frittatas in Your Dash Mini Toaster Oven