Nutty & Fruity Cookie and Kate Granola
Looking for a tasty breakfast? My Cookie and Kate granola combines oats, nuts, and dried fruits for a crunchy delight. Perfect for busy mornings!

Craving Crunchy Goodness? Let’s Talk Granola!
Have you ever opened a bag of store-bought granola, only to find it tastes more like cardboard than breakfast? yeah, me too! that's when i decided to take matters into my own hands and whip up a batch of cookie and kate granola .
Oh my gosh, the difference was night and day! this crunchy snack is totally easy to make, fun to eat, and packed with your favorite flavors.
And trust me, once you go homemade, you won’t look back.
A Little Granola History
Granola has been around in various forms since the late 19th century. back in the day, it was all about healthy breakfasts, and people got pretty creative with the mix.
Fast forward to today, and it’s a huge thing. you can find granola all over—grocery stores, cafes, and even fancy brunch spots.
It's become a staple in american mornings, and for good reason! this nut and seed granola is a superstar in the world of healthy breakfast recipes and makes for great dried fruit snacks .
Now, let’s be real. making your own granola might sound a bit daunting, but this recipe is super easy! you’ll need about 10 minutes to throw everything together and another 30 minutes in the oven.
So, in less than an hour, you’ll have yourself a delicious, crispy granola that can serve your entire family!
The Benefits of Making Your Own Granola
You know what’s awesome about this homemade granola? it’s not just tasty; it's packed with nutrient-rich ingredients. you’ve got oats for balanced nutrition , nuts for protein, and seeds for a healthy boost.
Plus, this granola is packed with fiber, making it a great choice if you're looking for high-fiber snacks . and if you’re looking to cut back on sugar, you can easily adjust the sweetness level with maple syrup, making it one of the best low-sugar breakfast options out there.
Here’s an idea: this granola is perfect for any occasion—whether you’re hosting a brunch, celebrating a birthday, or just wanting a cozy saturday morning.
It’s become a go-to for my family gatherings, and let me tell you, it disappears faster than a plate of cookies at a kid’s birthday party!
Not to mention, the versatility of this cookie and kate granola is just unbelievable. you can toss it over yogurt, sprinkle it on smoothies, or even snack on it straight from the jar.
Talk about a quick and easy granola recipe that has your back for all your breakfast bowl ideas !
Oh, and let’s not forget cost. homemade granola is way cheaper than those fancy store-bought brands that charge an arm and a leg.
You’ll get a solid 8 servings from this recipe without breaking the bank, plus you can customize it to your liking.
How cool is that?
Ready to Get Cooking?
So, if you’re down for a crunchy, nutritious treat that’s tailor-made for your taste buds, then hold on tight! we’re gonna dive into the ingredients next.
You’re going to love this nutty and fruity delight that’s full of flavors, textures, and wholesome goodness. get ready to impress yourself and anyone lucky enough to share this with you!
Onward to ingredients, my friends! ✨
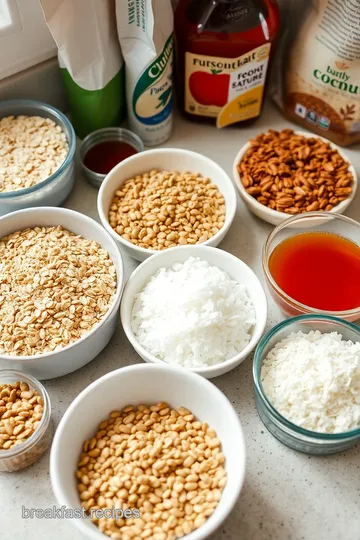
Essential Ingredients Guide
When it comes to whipping up incredible dishes, having a solid essential ingredients guide is like having a trusty friend by your side in the kitchen.
Let’s dive into what you absolutely need to make your meals pop, especially if you're into of those healthy breakfast recipes that everyone raves about.
Premium Core Components
First up, let's talk about the Premium Core Components . These are the building blocks of so many recipes, including our star player, the cookie and kate granola !
- Detailed Measurements : For the most part, I stick to U.S. customary and metric measurements—no one has time for math during dinner prep, right? So, here's the scoop:
- 1 cup = 240 ml
- 1 tablespoon = 15 ml
- Quality Indicators : You wanna look for oats that are old-fashioned rolled , nuts that shine without any stale smell, and seeds that are fresh and crunchy. Seriously, you can taste the difference!
- Storage Guidelines : Keep your grains in a cool, dry place. Oats can last about 6–12 months in an airtight container. Nuts? They’re good for about 6 months in the pantry and up to a year in the fridge!
- Freshness Tips : Check expiration dates and for any weird smells . Old ingredients are sad ingredients!
Signature Seasoning Blend
Now, let’s dive into what makes your food sing: the Signature Seasoning Blend !
- Essential Spice Combinations : You can’t go wrong with cinnamon in your granola or oatmeal recipes . It elevates the whole vibe!
- Herb Selections and Pairings : Try pairing sage with butternut squash, or basil with tomatoes. They’re a match made in flavor heaven.
- Flavor Enhancers : Don’t forget the magic of vanilla extract and citrus zest—they can totally revolutionize your dish!
- Regional Variations : Ever tried Southern-style spices versus Northeast? They can turn a simple veggie stir-fry into a culinary world tour.
Smart Substitutions
We gotta chat about Smart Substitutions because hey, life happens!
- Common Alternatives : Ran out of butter? Use coconut oil or applesauce for healthy baking swaps.
- Dietary Modifications : Want to make it vegan? Swap honey for maple syrup .
- Emergency Replacements : No oats? No problem! Use quinoa as granola’s best friend.
- Seasonal Options : Fresh fruits of the season can totally switch the game up! Think berries in summer or dried coconuts in fall.
Kitchen Equipment Essentials
Lastly, let's not forget your tools! Our Kitchen Equipment Essentials can make or break your cooking game.
- Must-Have Tools : A good mixing bowl, measuring cups, and a sturdy spatula are your best pals. You’d be amazed how often I reach for these!
- Alternative Equipment Options : No food processor? A sharp knife and a strong will will do. Trust me, you can chop anything by hand!
- Preparation Tips : Don’t underestimate the power of prep. Have everything ready before you start cooking—less stress, more fun!
- Storage Solutions : Invest in a few good glass containers . They not only look great but will keep your meals fresh!
Get ready to turn your kitchen into a flavor lab! up next, i’ll take you through the actual steps to create that nutty & fruity cookie and kate granola .
This stuff is the bomb for breakfast or a crunchy snack. you'll be in love with all the healthy meal prep ideas that'll make your mornings breezy!
Stay tuned, my friend!
Mastering the Art of Professional Cooking: Your Go-To Guide
Ah, the world of professional cooking! it's like stepping into a whirlwind of flavors, techniques, and some serious kitchen magic.
You might think professional chefs just sprinkle in a little culinary fairy dust to create masterpieces, but nah, it’s all about the right steps, planning, and a sprinkle of love.
So let's break that down and see how you can rock these professional cooking methods in your home kitchen.
Essential Preparation Steps
First things first: mise en place . sounds fancy, right? but it just means “everything in its place.” get your ingredients ready.
Chop your nuts, measure your oats, and maybe even cue up some tunes. it makes your cooking more efficient and way less chaotic (trust me, i learned that the hard way).
Time management is also key. prep your ingredients before you even turn on the oven. this doesn’t just save time; it helps you avoid the classic “oops, i forgot the salt!” moment.
And speaking of organization, keep your workspace clean. trust me, a tidy kitchen is like a breath of fresh air amidst the flour clouds.
Oh, and don’t forget safety! Always have your oven mitts handy when working with hot pans. It might seem like common sense, but honestly, a quick oops can happen when you’re distracted.
Step-by-Step Process
Let’s dive into the nitty-gritty. When you’re making something like Cookie and Kate granola , you want to follow a clear path. Here’s a quick breakdown:
- Preheat the Oven: Set it to 325° F ( 163° C) .
- Mix Dry Ingredients: Combine oats, nuts, seeds, and all that good stuff.
- Combine Wet Ingredients: Whisk together maple syrup and melted coconut oil in another bowl.
- Combine Mixtures: Pour those wet goodies over the dry and stir like you’re mixing magic!
- Spread on Baking Sheet: Get it all laid out evenly; this is where the golden brown action happens!
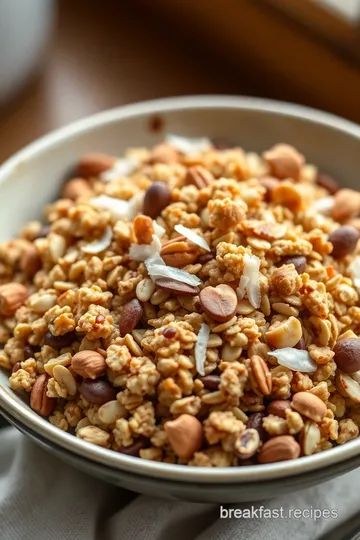
- Bake: Stick it in the oven for about 20- 30 minutes , stirring halfway through. You'll want it to look golden brown for that perfect crunch.
- Cool and Add Dried Fruit: Patience is key here, so let it cool before mixing in your fruits.
And remember, timing is everything! Keep an eye on that clock because burnt granola is heartbreaking.
Expert Techniques
Once you're comfortable with the basics, it's time for some expert techniques. professional cooks often do things in a specific order to achieve that restaurant-quality finish.
For instance, when your granola is baking, turn on the kitchen fan to keep things cool and fresh. if something goes wrong—like your granola’s too soggy—don’t fret! just toss it back in the oven for a few minutes.
Quality checkpoints are another pro tip: every so often check for those visual cues for doneness . If it smells heavenly and looks golden, you’re on the right track!
Success Strategies
Listen, we all mess up in the kitchen sometimes. Common mistakes include overmixing or forgetting essential ingredients. A little bit of salt elevates sweetness, don’t skip it!
For quality assurance, trust your instincts. if something doesn’t taste right, it probably needs tweaking. and hey, if you want to prep in advance, this nutty granola can be stored in an airtight container for weeks.
If you’re feeling adventurous, try out different granola variations . Switch up your nuts, toss in coconut flakes, or even go wild with cinnamon! The kitchen is your playground, after all.
Wrapping It Up with Additional Information
So there you have it—your inside scoop on professional cooking methods and how you can bring them into your everyday routine.
From healthy breakfast recipes to nut and seed granola , don’t be afraid to experiment and find what works for you.
And remember, cooking is about having fun, so grab your friends or family and whip up a batch of this delightful cookie and kate granola .
You’ll not just whip up a wholesome snack but create some lasting memories along the way!
Now, let’s slide into some additional information—perhaps discover new easy baking recipes or explore ideas for make-ahead options . Your culinary journey has just begun!

Additional Recipe Information for Cookie and Kate Granola
When it comes to making homemade granola , there’s nothing quite like a batch of cookie and kate granola to elevate your breakfast game.
Trust me, once you taste this nutty and fruity mix, you’ll wonder how you ever lived without it. let me share some pro tips and secrets to help you nail this quick and easy granola recipe.
Pro Tips & Secrets
First things first, let's talk time-saving techniques . if you’ve got busy mornings, prepare a big batch on the weekend. it keeps great, so you’ll have a delicious breakfast or snack ready to go.
Store it in an airtight container, and you won’t have to waste precious minutes figuring out what to eat in the morning.
Now, to enhance that flavor, sprinkle in some extra spices like nutmeg or vanilla extract. seriously, a dash of cayenne can take your granola to a whole new level if you're feeling adventurous.
You can thank me later!
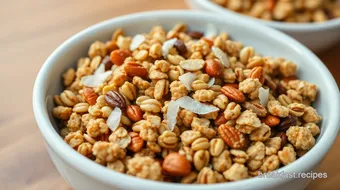
When it comes to presentation, the way you plate your granola matters, too! layer it in a clear jar or bowl with some yogurt and fresh fruits, and voila—your breakfast just looks ten times more appetizing.
You eat with your eyes first, am i right?
Perfect Presentation
Speaking of presentation, let's spice things up with some garnish ideas ! you can sprinkle some chopped nuts or a drizzle of honey on top for that extra visual appeal.
How about some fresh berries? they not only add color but also a splash of freshness to your breakfast bowl.
For a colorful twist, think about mixing different dried fruits. Dried cranberries not only look pretty, but they also add a tartness that balances the sweetness of maple syrup granola beautifully.
Storage & Make-Ahead
Alright, let’s chat storage and make-ahead . the beauty of this nut and seed granola recipe is that it stays fresh for up to two weeks when stored properly.
Keep it in a cool place and make sure it’s in an airtight container. if you want to keep it longer, you can freeze it in a resealable bag—easy peasy!
Creative Variations
One of the coolest things about making your own granola is that you can customize it to fit your mood.
If you’re into seasonal flavors, consider adding pumpkin spice in the fall or coconut flakes in the summer. those extra ingredients can really make your granola stand out.
Not to mention, for those who are watching their sugar intake, you can always reduce the maple syrup. there are also plenty of low-sugar breakfast options that you can whip together using this granola as a base.
Complete Nutrition Guide
Let’s not forget about the health benefits here. this nutrient-packed granola is a fantastic source of fiber. you’re looking at around 5 g of fiber per serving , which is a great boost for your digestion! plus, with healthy fats from nuts and coconut, it’ll keep you feeling full longer.
And let’s be honest, that’s what we all want in our busy mornings, right?
Expert FAQ Solutions
If you’re wondering about common questions regarding your granola, here’s the scoop. if it’s clumping together too much, that often means you’re using too much liquid.
Try reducing the syrup next time. and if it seems too dry, you can easily hydrate it a bit with some water before baking.
Stuck on how to serve? Honestly, it’s super versatile. You can toss it in yogurt, sprinkle it on smoothies, or just grab a handful for a quick energy-boosting snack .
Conclusion
So there you have it, my friends! with these tips on cookie and kate granola , you’re fully equipped to create a fantastic and healthy start to your day.
This balanced nutrition powerhouse has the tastiness, the crunch, and the versatility to fit into your breakfast bowl ideas or snack time.
Let your creativity shine through with customizations, variations, and flavors that suit you best. happy munching!
Nutty & Fruity Cookie and Kate Granola Card
⚖️ Ingredients:
- 3 cups old-fashioned rolled oats
- 1 cup chopped nuts (such as almonds or walnuts)
- 1/2 cup seeds (such as pumpkin or sunflower seeds)
- 1/2 cup unsweetened shredded coconut
- 1/2 cup pure maple syrup
- 1/3 cup melted coconut oil
- 1 teaspoon ground cinnamon
- 1/2 teaspoon salt
- 1 cup chopped dried fruit (such as raisins, cranberries, or apricots)
🥄 Instructions:
- Step 1: Preheat the Oven: Set the oven to 325°F (163°C).
- Step 2: Mix Dry Ingredients: In a large mixing bowl, combine the rolled oats, chopped nuts, seeds, shredded coconut, cinnamon, and salt.
- Step 3: Combine Wet Ingredients: In a separate bowl, mix the melted coconut oil and maple syrup until well combined.
- Step 4: Combine Mixtures: Pour the wet ingredients over the dry ingredients and stir until everything is evenly coated.
- Step 5: Spread on Baking Sheet: Transfer the mixture to a lined baking sheet, spreading it out evenly.
- Step 6: Bake: Bake for 20-30 minutes, stirring halfway through, until golden brown.
- Step 7: Cool and Add Dried Fruit: Once done, allow the granola to cool on the baking sheet, then mix in the dried fruit.
- Step 8: Store: Once cooled completely, transfer granola to an airtight container for storage.
Previous Recipe: How to Make Perfect Einstein Bagels: Delicious Nutrition Hacks!
Next Recipe: How to Make My Grandmother's Quaker Oats Oatmeal Raisin Cookies