Savory Power Bars
Craving Savory Power Bars? Join to Print A savory take on the DIY Power Bars I developed years ago when writing Super Natural Cooking. Perfect plane snacks! Discover now!

- Ready to Rethink Your Snack Game?
- A Hug of History and Nutrition
- The Complete Guide to Authentic Savory Power Bars
- The Magic Behind This Recipe
- Health and Nutrition Highlights
- Recipe at a Glance
- Essential Components Guide
- Kitchen Equipment Essentials
- Expert Cooking Method for Savory Power Bars
- Professional Secrets
- Perfect Presentation
- Storage and Make-Ahead
- Creative Variations
- Complete Nutrition Guide
- Expert FAQ Solutions
- Recipe Card
Ready to Rethink Your Snack Game?
Have you ever found yourself staring at the usual store-bought energy bars and thought, “is there anything more exciting out there?” spoiler alert: there totally is! say hello to these savory power bars —a delicious twist on the often-too-sweet snack that takes mere minutes to whip up.
They’re not just snacks; they're a whole new experience! made with crumbled kale chips, oil-cured olives, and crunchy walnuts, they're here to shake things up without all the sugar rush.
So, if you're ready for a little kitchen adventure, let's dive into the story behind these bars.
A Hug of History and Nutrition
These bars didn't just drop from the sky—they were thoughtfully crafted during my time working on super natural cooking , where i discovered the joy of making homemade nutritional energy bars .
Traditionally, snack bars have been sugar-filled and overly sweet, but this recipe stands out with its blend of savory goodness and surprising textures.
The concept of savory snacks isn’t new; folks have enjoyed them for centuries, particularly in anglo-saxon cuisine. think of the rich, hearty flavors that come from roasted nuts and herbs! how genius was it to take that love for savory goodies and capture it in a quick, on-the-go form? these bars are packed with protein, making them fantastic for anyone from buzzing professionals to adventurous hikers.
What makes these diy protein bars unique? well, they have a savory twist that leaves you satisfied without the guilt.
Imagine munching on something that feels robust and comforting while still being totally healthy—what’s not to love?
The Complete Guide to Authentic Savory Power Bars
See, these bars aren't just random snacks; they have a rich culinary heritage. their origin story is intriguing. over the years, as people searched for healthy convenience foods, they realized that sweet was just a slice of the pie.
The rise of plant-based snacks and healthier options has made savory snacks like these super popular in today's health-conscious world.
Historically, energy bars typically relied on sugar and sweetness to appeal to our taste buds, but these savory gems flip that script completely! as people are becoming more aware of their diets, the modern-day popularity of wholesome alternatives is skyrocketing—rankings of healthy snacks for travel have shifted, and savvy recipes like these are finding their way into the hearts of many.
The Magic Behind This Recipe
Now, i can’t help but mention the unique flavor combinations. just think about it: the crunch of toasted walnuts, the salty, briny kick from olives, and the nourishment from kale chips all rolled into one.
It’s like your taste buds are throwing a party!
Mastering the techniques in this recipe is also foolproof—simply mix, heat, and press. it's like a chemistry experiment but with delicious results! if you've ever felt intimidated by cooking, don’t worry.
This method is thoroughly tested and straightforward, even for beginner cooks. and i promise you’ll save time here; it takes just 15 minutes total! perfect for a busy weeknight when life decides to get a little chaotic.
Health and Nutrition Highlights
Okay, let’s get real. What about nutrition? These bars aren’t just a pretty face; they pack a nutritional punch!
With ingredients like kale and walnuts, they’re not just guilt-free snacks ; they are nutritional energy bars that fuel your day without the sugar crash.
Speaking of health, they are wonderfully gluten-free when you use certified oats and also cater to plant-based diets. so, whether you’re prepping for a workout, looking for a healthy lifestyle snack , or just need something quick to munch on, these bars tick all the boxes!
Recipe at a Glance
- Total preparation time: Just 15 minutes!
- Skill level required: Seriously, it’s easy!
- Serving size: Makes 16 bars , perfect for sharing—or not.
- Cost efficiency: You can create these artisan snack bars for much less than what you'd spend at the store.
Before we dive into the nitty-gritty of the ingredients you’ll need, just imagine how satisfying it’ll be to whip these up and have them ready for snacking, whether at home, on a road trip, or at work.
They’re not just any old snack, but deliciously portable snack ideas that can be tailored to your taste!
So, let’s take the leap into the next section where I’ll share the ingredient breakdown and show just how easy it is to have these delicious no-bake energy bars in your kitchen today!
Essential Components Guide
Hey there, friend! so, let’s chat about something close to my heart—snacks! but not just any snacks; i’m talking about savory power bars ! you know, those easy, nutritious bites that can save the day when you’re in a pinch or just feeling a bit snacky? yep, we’re diving deep into the ingredients that make them super delicious and how to get the best out of each component.
Premium Core Ingredients
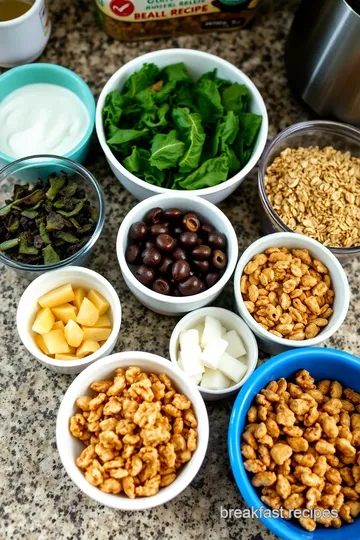
First off, let’s establish those premium core ingredients you’ll want for your power bars. Here’s what I used for my recipe:
- 1 tablespoon coconut oil or ghee
- 1 1/4 cups rolled oats
- 1/2 cup kale chips, crumbled
- 1/2 cup chopped oil-cured olives
- 1 cup chopped toasted walnuts
- 1 1/2 cups unsweetened crisp brown rice cereal
- 1 cup brown rice syrup
- (optional) pinch of saffron and dried chile flakes
- scant 1/2 teaspoon fine-grain sea salt
Now, about measurements—trust me, precision matters here, especially when you’re heating the syrup or mixing in those delightfully crunchy elements.
Quality indicators for these ingredients include checking your oats for freshness and making sure your kale chips are nice and crunchy (no one wants a stale snack, right?).
Selection tips? look for the freshest ingredients. grab organic when possible; it makes a difference. and as for storage, keep your bars in an airtight container for up to two weeks.
You can also individually wrap them in parchment paper for those busy days when you just need to grab and go!
Signature Seasoning Blend
Now, let’s sprinkle in some excitement with our signature seasoning blend ! the beauty of these bars is in the flavorings.
The olive oil and brown rice syrup combo creates an almost caramel-like sweet note that perfectly complements the nuttiness of the walnuts and the richness of those oil-cured olives.
I mean, how often do you find yourself craving guilt-free snacks that are actually tasty?
If you’re looking to spice things up, add a pinch of dried chile flakes for that kick! and saffron, while optional, gives a unique twist that elevates your homemade power bars to artisan snack levels.
But hey, if saffron’s not in your pantry, don’t fret—leave it out or maybe sub in some turmeric for color and health benefits.
Smart Substitutions
Now, what if you’re like, “oh no, i don’t have kale chips!”? not to worry, because we’ve got some smart substitutions .
You could easily use nut-based snacks or even roasted chickpeas for that crunch factor instead! if you're in a pinch, sub the brown rice syrup with honey or a favorite natural sweetener you have at home.
During different seasons, you might find it fun to swap out the dried fruits or herbs based on what’s fresh and available.
Summer means sun-dried tomatoes could bring a vibrant punch, while autumn could rock some pumpkin seeds mixed in!
Kitchen Equipment Essentials
Let’s chat about the kitchen equipment essentials . Trust me, you don’t need anything too fancy here:
- Must-have tools: A mixing bowl and a rubber spatula are your best friends for this recipe.
- Recommended appliances: A small saucepan for the syrup concoction, and consider a food processor if you're feeling lazy chopping.
- Helpful gadgets: I swear by parchment paper, especially for those no-bake energy bars! It saves you a bunch of scrubbing later.
- Home alternatives: No 8 x 8-inch pan? Go for a loaf tin or any baking dish you have on hand.
Pro Ingredient Tips
And to finish it all off, here are some pro ingredient tips! always look for fresh, organic ingredients when possible; they really elevate your healthy eating on the go.
Keep your nuts stored in the fridge to maintain freshness, and try to buy in bulk—you’ll save money and know you're always stocked for emergencies!
If you’re looking to make a vegan power bar recipe , swapping ghee for coconut oil will do just the trick. Also, opt for gluten-free oats if you’re avoiding gluten!
When it’s time to whip up these bars, remember these tips and get ready to dive into the instructions section that comes next.
Trust me, once you see how easy it is, you’ll be whipping up healthy snacks for travel in no time! want a unique alternative? stay tuned! you won’t want to miss this simple but delicious journey into snack perfection.
Expert Cooking Method for Savory Power Bars
Oh my gosh, let’s talk about savory power bars ! i mean, we all love a good snack, right? but sometimes, those sugary energy bars just don’t cut it.
Enter these little gems, developed years ago while i was diving deep into recipes for super natural cooking . seriously, they’re perfect for when you’re on the go—sitting in an airport or hiking up a mountain.
Plus, they’re super easy to whip up!
Essential Preparation Steps
Before diving into the cooking method, let’s chat a bit about mise en place —a fancy french phrase that just means having everything prepped and organized before you start.
Gather your ingredients first: a tablespoon of coconut oil or ghee, rolled oats, crumbled kale chips, chopped oil-cured olives, toasted walnuts, crisp brown rice cereal, brown rice syrup, and those optional saffron and chile flakes.
You’ll feel like a kitchen pro!
Time Management & Organization Tips
Set aside just 15 minutes —5 for prep and 10 for cooking. oh, and it’s helpful to have a clean workspace! i like lining my counter with everything i need.
Plus, get that 8 x 8-inch baking pan or a 9 x 13-inch one out, depending on how thick you want your bars.
The thicker, the better, if you ask me!
Professional Cooking Method
Alright, let’s get to the good stuff—the cooking!
-
Gr lub your pan : Get that baking pan greased up with coconut oil or ghee. It’s like giving your bars a VIP treatment so they don’t stick!
-
Combine the dry goods : in a big ol’ bowl, mix together the rolled oats, crumbled kale chips, olives, walnuts, and brown rice cereal.
Just a gentle stir will do—we’re not trying to launch a rocket here!
-
The syrup magic : in a small saucepan, combine the brown rice syrup, saffron, optional chile flakes, and a pinch of salt.
Heat it on medium until it starts to bubble, about 4 minutes . you’ll want to stir it so it doesn’t stick.
The smell is amazing, and you feel like a chemist in a lab!
-
Mix it up : Pour that sticky goodness over your dry mixture and mix it until everything is coated. It’s a bit of a workout, but so worth it.
-
Spread and compress : transfer this lovely mix to your greased pan, spreading it evenly. now, here’s where the magic happens—press down hard! really compact those bars.
Let them cool to room temperature, but give them a little press halfway through.
-
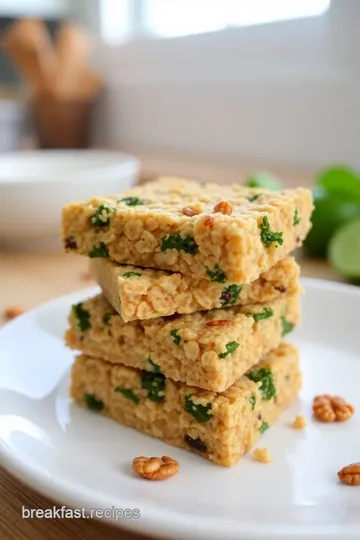
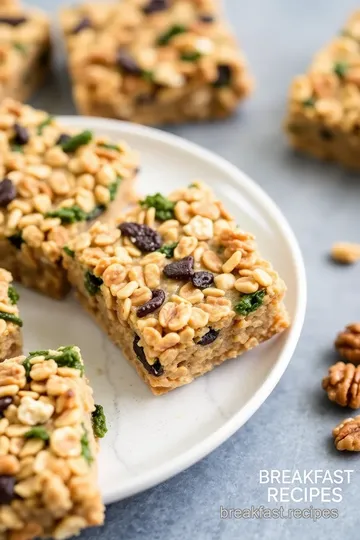
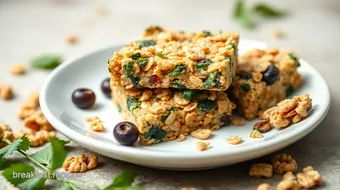
Cut and enjoy : After they’ve cooled, slice them into bars. You can go big or small—totally your call!
Expert Techniques
Here's where it gets a bit more technical—well, kind of! temperature control is key; you don’t want to boil your syrup too long and end up with a brick (no one likes that).
Timing matters, too. if you've compressed those bars well and let them cool completely, you’ll be rewarded with nice, sturdy bites.
Critical Points and Quality Checks
- Compression : This is crucial for those bars to hold together. If they’re crumbly, give them another press next time.
- Cool completely : I know it’s tempting to dig in, but patience is a virtue here!
- Storage tips : Wrap them in parchment paper for the ultimate wholesome travel snacks that are ready whenever you need them.
Success Strategies
Let’s face it—snack-making can go wrong. Here are some troubleshooting tips:
- Too crumbly ? You might need to adjust your syrup ratio next time—more syrup means more adherence!
- Flavor Not There ? Try adding spices, herbs, or even a bit of nutritional yeast for a zesty kick.
- Storage Tip: An airtight container keeps them fresh for longer.
As you whip up these bars, don’t forget the joy of experimenting with flavors! toss in some chili powder for heat or swap in your favorite nuts and seeds.
This is where your personality can shine through in healthy cooking !
With these delicious no-bake energy bars , you’ve got yourself a nourishing, guilt-free snack that’s perfect for all occasions. these bars are packed full of nutrients—ideal for a quick pick-me-up or a travel snack that won’t derail your healthy eating goals.
Stay tuned—next up, we’ll explore more tempting gluten-free snack recipes and some innovative ways to make your snacks even more flavorful!
Professional Secrets
Oh my gosh, you wouldn’t believe how many times my kitchen adventures have gone sideways! but you know what? that’s half the fun.
Over the years, i’ve picked up some professional insights that really help make things smoother, especially when whipping up something like savory power bars .
One expert technique i always emphasize is prep time . seriously, having your ingredients ready to go saves you from a chaotic cooking experience.
Set everything out like you’re getting ready for a little cooking ritual.
Now, let’s talk kitchen wisdom . you don’t need fancy gadgets; just a good baking pan, a sturdy spoon, and your imagination.
And success guarantees ? it’s all in the mix! trust your instincts and taste as you go.
Perfect Presentation
Alright, let’s get all fancy now! you know how food can be a feast for the eyes, too? when your homemade power bars come out, don’t just slice and serve.
Plating techniques are everything! try stacking them nicely on a wooden board or even wrapping them up like a little gift in parchment paper.
It adds a personal touch!
When it comes to garnish ideas , a sprinkle of kale chips or some crushed nuts on top can elevate your snack.
And to really make your bars pop, maybe a side of fresh fruit or a dollop of greek yogurt never hurt anyone.
Seriously, visual appeal tips can turn your simple snacks into artisan delights!
Storage and Make-Ahead
I always get asked about storage guidelines . well, here’s the scoop: wrap each bar in parchment paper and pop them in an airtight container.
This way, they stay fresh and are ready to grab when you’re on the go. with these healthy snacks for travel , you're less likely to give in to those pesky gas station chips.
Now, if you’re wondering about preservation methods , keep them in the fridge for up to a couple of weeks or freeze them for longer–just remember to let them thaw a bit before munching.
For reheating instructions , nope! these are no-bake energy bars , so they taste great straight from the fridge or even at room temperature.
Just be mindful of freshness tips —the less air exposure, the better.
Creative Variations
What’s cool about these Savory Power Bars is the endless possibilities! For those of us who like flavor adaptations , why not toss in some sun-dried tomatoes or a dash of your favorite herbs? Feeling adventurous? A spicy snack idea could be throwing in some chili flakes that’ll give it some kick!
And you can totally personalize for dietary needs. want a vegan option? simply use agave syrup instead of brown rice syrup.
Check out those seasonal twists too; swap out nuts depending on what you’ve got on hand, or incorporate pumpkin seeds in the fall.
Explore those regional variations – maybe you want to add some local flavor like cheddar cheese or even saffron recipes !
Complete Nutrition Guide
Now let’s get serious for a sec – we all want to feel our best, right? here’s a detailed breakdown of how our savory power bars stack up nutritionally.
Each bar is about 148 calories, with a handy mix of protein , carbohydrates , and healthy fats. plus, with health benefits coming from kale, olives, and walnuts, it’s a guilt-free treat in disguise.
When it comes to dietary information , these bars are customizable. stick to your nutrition goals, whatever they might be.
And for portion guidance , when the bars are cut into 16 pieces, you’ve got an easy way to moderate your snack intake!
Expert FAQ Solutions
Let’s clear up some common concerns, shall we? one thing i’ve run into is people worrying their bars won’t hold together.
My troubleshooting guide ? make sure to compress them down firmly when they’re cooling. oh, and don’t stress too much if the texture isn’t perfect—sometimes those little imperfections give them charm!
And remember, success tips like taste-testing are key. Cook and adjust as you go. If you want a little more sweetness, feel free to drizzle in extra syrup.
So, in conclusion, making your own savory power bars doesn’t have to be a daunting task! you get all the benefits of nutritional energy bars without the craziness of a trip to the store.
This process can be filled with joy, creativity, and a sprinkle of successful learning experiences. whip those up in your kitchen and feel good about what you’re snacking on—your future self will thank you!
Savory Power Bars Card
⚖️ Ingredients:
- 1 tablespoon coconut oil or ghee
- 1 1/4 cups rolled oats
- 1/2 cup kale chips, crumbled
- 1/2 cup chopped oil-cured olives
- 1 cup chopped toasted walnuts
- 1 1/2 cups unsweetened crisp brown rice cereal
- 1 cup brown rice syrup
- Pinch of saffron (optional)
- Pinch of dried chile flakes (optional)
- Scant 1/2 teaspoon fine-grain sea salt
🥄 Instructions:
- Step 1: Grease the baking pan with coconut oil or ghee. Choose an 8 x 8-inch pan for thicker bars or a 9 x 13-inch pan for thinner bars.
- Step 2: In a large bowl, combine rolled oats, crumbled kale chips, olives, walnuts, and crispy brown rice cereal.
- Step 3: In a small saucepan over medium heat, combine brown rice syrup, saffron, chile flakes, and sea salt. Stir constantly as it comes to a boil, thickening slightly (about 4 minutes).
- Step 4: Pour the syrup mixture over the dry ingredients and stir until all ingredients are evenly coated.
- Step 5: Transfer the mixture to the prepared pan, spreading it evenly. Press down firmly to compress the bars while cooling.
- Step 6: Allow to cool to room temperature before cutting into desired sizes.
Previous Recipe: Seeded Popovers: The Ultimate Healthy Brunch Delight!
Next Recipe: Easy Savory Waffles: 5 Delicious Besan Creations for Any Meal!